Poorly crimped main cable creating excess heat. Double stacking, stainless nuts make for extremely poor conductors.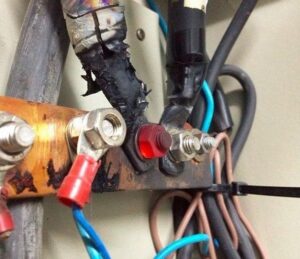
More often than not a loose connection or poorly connected cable in your DC system will heavily affect charging and discharging of your battery.
We get many phone calls complaining that our charger is in float but the battery monitor is only showing 60% charge. 99.5% of the time after working through the issue with the customer we find a loose connection or badly installed/crimped cable. ¼ of a turn on a nut or screw can make a massive difference in current flow.
When a charge source connected to a lead acid battery starts up, it tries to push as much current as possible based on the voltage the charger is reading from the battery. As the voltage rises and the battery reaches around 80% state of charge, the current will start to slow down due to the resistance building in the battery and eventually the battery will fill to 100% and the charger will enter the float state to maintain the battery.
Now if you have a loose connection in the charging line for example, the charger will start up like above but the loose connection will start to heat up as the charge source is trying to push the current through it. As the connection heats up, the resistance builds in the connection and the charger starts to reduce the current as the voltage rises and the charger will go into an early float state and the battery will not get charged. With very loose connections, the charger may only push 25% of its maximum current as the resistance is so high due to the poor connection.
The same goes for poorly crimped or soldered connections. It may seem alright by just looking at it, but grab the cable a give it a good pull. The wire and connector should still hold together after trying to pull them apart with great force. If the connection can be pulled apart, the crimp was not done correctly. A poor crimp leaves air pockets between the wire and connector. Air pockets allow moisture to collect, moisture causes corrosion, corrosion causes resistance, resistance causes heat, and ultimately will lead to a break down in the connection and worst case, catch fire. If you find a poor connection here, replace the terminal on the cable with a proper crimped/soldered lug.
Screwed Compression Fitting
For cables that are installed in a “Screwed Down Compression” style fitting (see image), it is not recommended to solder the ends of the cable. As you screw down on the bare cable the compression of the fitting makes the connection. When the cable has been soldered, the solder will expand under charge and contract when not charging. Over time the screwed compression fitting will become loose due to the expansion/contraction of the soldered cable and resistance/heat will start to build within the connection and very bad things start to happen (see photo below).
Incorrect wire & fitment for the job Result of soldered cables in a compression fitting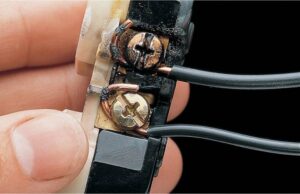

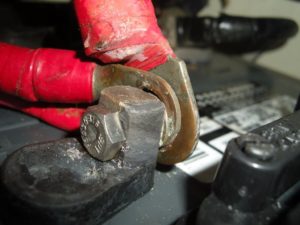
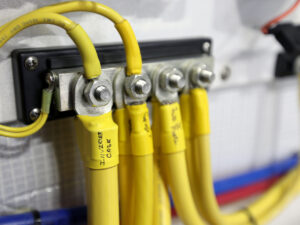
When cable connections are installed on bus bars or cable studs, we consistently see what we like to call “the staking issue” (see image). When cables are installed in this way, the largest cable with the biggest lug should be installed first, then the next largest and so on.Basically you will end up with the cables looking like a Christmas tree, fat at the bottom, thin at the top. We see many installs with the reverse setup, or smaller cables scattered through-out the stack. The larger cables will generally be your charging sources or inverter.
Cable stacking done wrong Incorrect cable installation
Say you installed the inverter cable on the top of the stack. When you try and put a load through the inverter, the DC current is trying to transfer through the cable lugs that are stacked underneath the inverter cable, heating up the smaller cables & lugs, building resistance and ultimately not being able to transfer the full current required by the inverter. So, your 1000w inverter may only achieve a 600W output because of the way the DC cables have been installed.
The Perfect Solution
All these issues can be easily avoided with the correct crimping and soldering tools and some basic common sense. If you charging system is behaving poorly the first thing to look at is your connections. With any mobile application, connections will work their way loose over time due to vibration. Part of your maintenance program should include checking all electrical and cable crimp connections every six months to ensure they are solidly crimped and mounted so your electrical system will operate at its peak performance.
If you like what you’ve read, you can find even more helpful advice by joining our Enerdrive Unplugged Facebook group! The group is for sharing installations, errors in installations and best practice install guidelines utilising Enerdrive Products across Caravans, Campers and 4WDs. Acting as a space to leave feedback and comments, get inspired and learn from other veteran users along the way!
